November 2010 4 posts
Setting up sendmail to use a client certificate
Friday, November 19, 2010
MTAs like sendmail and postfix act as both clients and servers. This page is about setting up sendmail to present a client certificate, not a server certificate. If you're trying to use your desktop email client to send email over encrypted SMTP, for example, this is probably not the right place to be looking.
One use case is this: I have a few machines that need to send email: a mail server on a static IP, and a few random machines at home on a dynamic IP. The ones at home can't send email directly because, due to spam, most email services don't accept emails directly from residential IPs. So for my machines to use sendmail, they have to relay through the mail server.
The problem is authentication. For the server to not become a spam-spewing open relay, it needs to know who is trying to use it as a relay. There are basically three reasonable ways for a client MTA to authenticate to a server MTA for relaying: the client's IP/hostname, a username/password, or a client certificate. I can't use my IP or hostname since it keeps changing, and using a username/password is too logical for me. So here's how to set up a client certificate.
First, either get an actual client certificate signed by a real CA, or sign your own. Note, if you buy one, it needs to be a client certificate and not some other type, i.e. it needs to pass this check:
$ openssl verify -purpose sslclient sendmail.crt
If you generated it using my instructions, the certificate can be used for any purpose and will be fine.
Now, copy the certificate and private key somewhere on your client machine. /etc/pki/tls/ is a good place to put these. Then add these two lines to /etc/mail/sendmail.mc:
define(`confCLIENT_CERT', `/etc/pki/tls/certs/sendmail.crt')dnl
define(`confCLIENT_KEY', `/etc/pki/tls/private/sendmail.key')dnl
You may have to install sendmail-cf before proceeding, so do that first. Then run make and restart sendmail:
# make -C /etc/mail
# /etc/init.d/sendmail restart
Now sendmail is correctly configured to present a client certificate when asked by a server. Note that the server must ask for a client certificate before one will be presented, and most servers don't do that by default. Also, for the certificate verification to succeed, the server needs to be configured to trust the certificate authority. That means if you signed the certificate yourself, the server needs to trust the certificate file of the CA that you signed the client certificate with.
Signing a certificate with your own certificate authority
Wednesday, November 10, 2010
In this post I'll describe how to quickly get set up as your own certificate authority and sign a certificate.
First, generate the CA certificate, making sure to fill in the Country Name, State or Province Name, and Common Name:
# cd /etc/pki/tls/certs/
# openssl req -new -x509 -extensions v3_ca -keyout ca.key -out ca.crt -days 3650
Next, generate a key and a certificate signing request. This can be done on a different machine. Again, be sure to fill in the three fields mentioned above.
# openssl genrsa -out server.key 1024
# openssl req -new -key server.key -out server.csr
When this is done, send the CSR file to the CA to be signed, and sign it:
# openssl ca -in server.csr -cert ca.crt -keyfile ca.key -out server.crt -days 3650
Depending on your distribution and configuration, the CA signing process might complain about certain files or directories not being found the first time this is run. If so, the index.txt file should be empty, and the serial file should contain the number 01.
For example, on Fedora/Redhat systems you can do this:
# touch /etc/pki/CA/index.txt
# echo '01' > /etc/pki/CA/serial
Now you're done! The files server.key and server.crt have the private key and the public certificate. You can verify the cert with:
$ openssl verify -CAfile ca.crt server.crt
Fedora 14 preupgrade doesn't require user interaction
Thursday, November 4, 2010
Fedora's preupgrade program is the recommended way to upgrade from an older release to a newer one. I've been simply using yum to upgrade in the past, but figured I'd give the recommended tool a try.
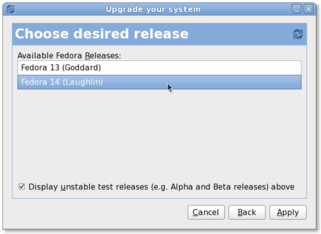
I had some issues with my /boot partition being too small, but the wiki page linked above had some workarounds so the program was able to successfully download all the packages and whatever else it needed. When I rebooted, I got the text-mode anaconda (the Fedora installer), which downloaded stage2, and then a couple of minutes later I got dumped at a black screen with a blinking cursor. It appears that X11 failed to start, and I think the culprit was nouveau not working properly with my Geforce 9500GT (which is supposed to be supported).
Anyway, the upgrade did successfully complete, even though the graphical interface never showed up. It appears that the graphical installation process is informational only, and requires absolutely no user interaction. I stared at the black screen for 1-2 hours (hard drive was spinning and lsof reported lots of rpm activity, so I knew it wasn't stuck), and then it automatically rebooted me into Fedora 14. Again, I did not interact with anaconda at all between when it tried to launch X and when it rebooted.
I was getting kind of nervous staring at that black screen for so long, wondering if all my files were getting hosed, so I tried to Google whether the installation would complete without user interaction but couldn't find any evidence either way. Well, the answer is yes, it works. Hopefully this will help the next person...
Resolving IP addresses with Bonjour and mDNS
Wednesday, November 3, 2010
OS X uses this strange mDNS thing that I haven't studied much, but what I have gathered is that host and nslookup don't work for resolving hostnames over mDNS. The way to do this is to use dns-sd -G, like:
$ dns-sd -G v4 foobar.local
Archives
2024
- September (1)
- March (1)
2023
- April (1)
2021
- February (2)
2020
- March (1)
- January (1)
2018
- April (1)
- March (1)
2017
- February (1)
2015
- March (1)
2014
- June (1)
- May (1)
- March (1)
2013
- December (1)
- May (1)
- April (1)
- March (2)
2012
- December (1)
- September (1)
- August (3)
- July (1)
- February (1)
- January (1)
2011
- December (1)
- June (1)
- April (1)
- March (1)
- January (2)
2010
- December (1)
November (4)
- October (1)
- June (2)
- May (1)
- March (1)
- February (2)
- January (2)
2009
- December (4)